CloudView
View your bookings at a glance with CloudView
Read more
If you are refurbishing a room or have some scheduled maintenance work and you want to make sure that no bookings are made in it, then you can learn how to mark it as “out-of-use” on CloudView by watching this video…
On the menu bar, click the tab called Maintenance. This opens a dropdown menu. Click on Notifications.
This shows a list of existing notifications. If you have not previously created a notification to block a room, then this list will be empty.
To create new notifications, click on Add New Record on the top left corner of the grid.
This opens an Add / Edit Notification page. Here, you can select the property you want to block, the room type, and the room number. If you want to block the whole property you can select All Room Types and All Rooms. Then you can select the dates in which you want to rooms to be blocked by using the date picker on the left of the date field. You can also type in a message to identify the notification. Press Submit to confirm. The new notification will now appear in the list.
To edit an existing notification, click on the pencil-edit icon on the left-hand-side of the notification. This opens an Add / Edit Notification page. Here, you can edit the notification details. Press Submit to confirm.
You have now successfully blocked a room.
You will see an entry on CloudView, in the notification colour, called Blocked. This blocked room is for information only; you will be able to make bookings in the room on this date if you need to. For more information on notifications, please see our User Guide, section 9.1.
Want to have a smooth functioning team and transparent communication among your staff? To use the Work Staff Feedback form for internal staff communication, please follow the steps laid out in this video…
Any member of the staff can use Work Staff Feedback. Point your cursor on Maintenance on the menu bar. This opens a dropdown menu. Click on Work Staff Feedback. This opens a Staff Feedback page.
To add feedback, click on Add New Record. This will open the Staff Feedback page. Your Employee Name and the Date is auto populated. The fields that you can add notes to are Things that went well, Problems/Improvements/Suggestions, Health and Safety issues. For example, employees that are finishing their shift to coordinate with the staff starting on the next shift can enter information into these fields.
Once all the relevant fields are entered, click Save.
To add Admin Notes, click on the pencil-edit icon on a previous record. On this page, you will be able to add comments in the Admin Notes section and also make changes to any other fields. Click Save.
For more information on staff feedback, please refer to our User Guide, section 9.2.
You have now successfully added a new record in Staff Feedback!
If you want a regular and organised housekeeping program scheduled for all your properties, then you can follow the steps laid out in this video…
On the menu bar, click on HouseKeeping. This will open the Room Cleaning page. This shows all the pending schedules.
To view all previous records of housekeeping, click on View All Records on the left side of the window. This will refresh the page with all the records. To view only the pending records again, click on the View Pending Records in the same location. This will refresh the page and show only the pending records.
To add a new entry, click on Add New Record located on the top left corner of the grid. This opens the HouseKeeping page. You can select a property from the list by clicking on the down arrow. This will give below a list of the total rooms in this property.
Select the date you want to schedule the cleaning in the Date On option by clicking on the Calendar icon. Check the box next to the rooms that needs attention. You can select the Type of cleaning required from Regular, Deep Cleaning and Check Out. Check out cleaning is auto scheduled when a booking is made. For more information on booking reservations, please watch the video How to Make a Reservation using CloudView or see our User Guide, section 3.1a to c.
Add date and time for the scheduled cleaning in Time In and Time Out option, if required. Notes can be added in the Found and Comments sections. You can also assign a cleaner to each record by clicking the down arrow in the Assigned To option and selecting a name from the list.
While reviewing housekeeping files, the Status option can be marked as Pending, Not Clean and Cleaned. You can also select a name in Reviewed By, and notify the cleaner if the room needs further attention by selecting an option in Reviewed Status. This gives you two options, Clean again and Approved.
If a previous record was scheduled automatically, the Is System Created will reflect as Yes. For example, the automatic Check Out cleaning will reflect as Yes here.
If a previous schedule was made and you would like to remove this entry, click on the delete icon at the left side of the screen. However, if the previous schedule has been pre-set, and the Is System Created shows Yes, you will not be able to delete this entry.
Once all the parameters are selected, click Submit.
You will get a confirmation on the screen as Records Submitted Successfully!
To print any cleaning records, click on HouseKeeping. On this page, select the Start Date, End Date, Zone, Property, and the Assigned To options and click Go. This will refresh the page with a list of scheduled cleaning.
Click Print Cleaning, located on the right of the screen. This will open a new window with a printer friendly version of the cleaning schedule and the Print window. Click Ok to print this page.
You have successfully printed your cleaning schedule!
To create a repeat schedule, click on HouseKeeping on the menu bar. This opens the Room Cleaning page with the list of existing records. Click on Create Scheduler on the top left corner of the grid. A new page with the housekeeping property details will appear. You can select the days to schedule the cleaning by checking the box next to the day. Check the required fields, such as Date From, Days, Room, Type, Time In, Comments, and Assigned To in this page and click on Submit. This allows you to create repeat records automatically for the days selected in the time period chosen.
You will get a confirmation on the screen as Records Submitted Successfully!
To edit any scheduled housekeeping records, click on HouseKeeping on the menu bar. This opens the Room Cleaning page with the list of existing records. Click on the pencil-edit icon on the record that you wish to edit. This will take you to the House Keeping page. Make your changes here, as described earlier. You can also navigate to CloudView by clicking on Go to Booking CloudView.
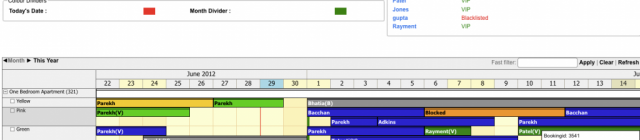
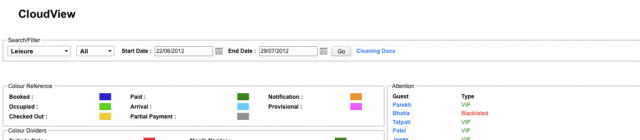
Another way to view the cleaning docs from CloudView is by clicking on CloudView on the menu bar. This will open the CloudView Masters page. To view the cleaning documentations, click on Cleaning Doc. This opens a page with the graphical format of the CloudView Cleaning Docs. You can also search for an individual cleaning list by entering a name in the Fast filter box. This will help you to track the pending jobs in an efficient manner. Fast filter enables you to Apply after entering a name, Clear to remove the entry, and Refresh the screen to get back to the original view.
To change the colour schemes on the Cleaning docs page, please see the video How to Change Colour Schemes or see our User Guide, section 1.1a.