CloudView
View your bookings at a glance with CloudView
Read more
Recording financial transactions can be stressful. You can document all your expenses and financial dealings including sales tax calculations by following the steps laid out in this video…
To make an entry of funds received, select Finance on the menu bar. This opens a dropdown menu. Click on Finance Transfer. This will take you to the Finance Transfer page. On the Payment From section, select the suitable Transaction Type. Select the mode of transaction on Cash/Bank/CC. Pick the date using the calendar icon on Transaction on.
In the Transaction Details section, enter the Account Name. This will give you a list to select your pre set account names. For more information on adding or editing accounts on this page, please watch the video How to Add or Edit Accounts or see our User Guide, section 1.2a-c.
Select the Zone and the Property Name, if required. Enter the Amount received. You can make any Notes for this particular transaction.
Under Only For Expenses, select your Supplier and the VAT for this transaction. The Net and VAT Amount is auto calculated. If the amount received is going to only one account, then click on Save & Create New.
However, if the amount received is to go to more than one account, you can split the entry by just clicking on Save. This will refresh the page with the entry you made on Transactions at the bottom of the screen. Here, you can add the details of the split transaction.
To make any edits on this entry, click the pencil edit icon and make your changes. You can also delete records on this screen by clicking on Delete.
Once you have finished splitting your transactions, click on Save & Create New.
To make an Expense Entry, on the menu bar, select on Finance and then click on Expense Entry. This will open the expense entry page with Payment From and Transaction Details. Select Direct Debit, Cash/Bank, Transaction on, and Dr/Cr.
Here, you can make direct debit transactions for regular utility bills. For more information on direct debits please watch the video How to Add or Edit Direct Debit Transactions or see our User Guide, section 1.2e.
Under Transaction Details, select the Account name and Amount. Add Notes if required. Under Only For Expenses, select your Supplier and the VAT for this transaction. The Net and VAT Amount is auto calculated. If the expenses entered are going to only one account, then click on Save & Create New.
If there are more than one expenses entry, click on Save. You can edit or delete any records in this page by following the steps mentioned earlier.
You have now successfully created and amended your financial transactions!
To view the summary of your transactions, please watch the video How to View Ledgers or see our User Guide, section 12.1-12.3.
Just like a bank statement, you can have all your financial transaction statements viewed on ALAVEX system. To view this information, please follow the steps laid out in this video…
To view a particular ledger, select Ledger on the menu bar and then click Individual Ledger. This will open the Account Ledger page. Enter the Account Name you wish to view. Select Zone, Property, and Date and then click View.
This will open a page with a graphical representation and the list of the financial transactions for this account. Scroll down to view the list. You can choose any account by filtering the parameters. To make changes to any transactions not associated with a booking, click on the relevant Document Number. This will open a Finance Transfer or Expense Entry page. For information on editing transactions please watch the video How to Create or Amend Expense Entries or see our User Guide, section 11. To make any changes to transactions associated with a booking, click on the relevant Document Number. This will open the booking page. For information on editing a booking, please watch the video How to Edit a Booking or refer to our User Guide, section 3.
You can also export your ledger to a document format. For more information on exporting reports, please watch the video How to View and Utilise Reports or see our User Guide, section 5.
If you are a landlord or agent and you want to view account ledgers and bookings made for all your properties at the comfort of your home, then you can follow the steps laid out in this video…
On the customer website, click on LOGIN from the menu bar. This will take you to the log in page with Agent/Landlord, Customer Login, and Corporate Login.
To log in as a landlord, click on Agent/Landlord. Enter your user name and password and click on Log In. The operators of your properties will give these log in details to you. This will take you to the Account Ledger page with default ACCOUNT LEDGER information. To view accounts for particular dates, select the dates in the From Date and To Date. Click View. This will refresh the page with the accounts for the days mentioned. You can also filter your search by clicking on any one of the parameters such as Date, Account Name and Zone.
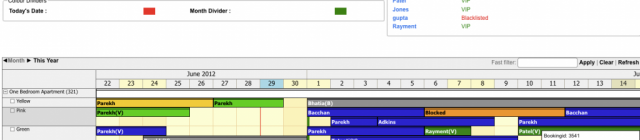
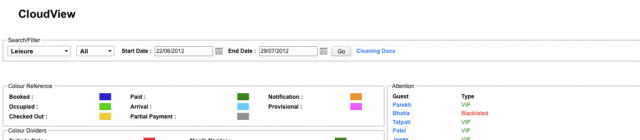
To view all the bookings for the properties owned by you, click on CLOUDVIEW. This will open a graphic view of the property list. You can filter and search for bookings on the Search/Filter option, Start Date, and End Date. Click on GO.
The Colour Reference and Colour Dividers explain the status of the bookings. Click on the arrows next to Month or click on This year to Fast filter.
You can also view all the Cancelled Bookings at the bottom of this screen. Use the filters like Booking ID, Guests, Date and Booking Status to search for specific entries.
To log in as an agent, click on Agent/Landlord. Enter the user name and password and click on Log In. The managers of the properties will give this log in details to you. This will take you to the Account Ledger page with default ACCOUNT LEDGER information. To view accounts for particular dates, select the dates in the From Date and To Date. Click View. This will refresh the page with the accounts for the days mentioned. You can also filter your search by clicking on any one of the parameters.
To view all the bookings made by you, click on MY BOOKINGS next to ACCOUNT LEDGER. This will open a page with all the bookings. To view bookings for particular days, select the dates on From Date and To Date and click on Go. You can also filter your search by clicking on any one of the parameters.
You have now accessed your accounts on the website successfully!
To view an account ledger as a Customer or a Corporate, on the customer website, click on LOGIN from the menu bar. This will take you to the log in page with Agent/Landlord, Customer Login, and Corporate Login.
Click on Customer Login or Corporate Login as required. Enter your User Name and Password. If you have forgotten your log in, please contact the property operator. Click on Log In.
This will open a page with default ACCOUNT LEDGER information. To view accounts for particular dates, select the dates in the From Date and To Date. Click Go. This will refresh the page with the accounts for the days mentioned
You can also view the bookings made on your account. To view your bookings, click on MY BOOKINGS next to ACCOUNT LEDGER. This will open a page with all the bookings. To view bookings for particular days, select the dates on From Date and To Date and click on Go. You can view the Overall Outstanding balance next to GO.
You have now accessed your accounts on the website successfully!